
Group control or central control functions for shading are desired frequently. There are several ways to do this, but there are pros and cons.
The explanations below refer to group control or central control functions. However, both methods are equivalent, and the programming and execution are identical.
Version 1: Create a group
The easiest solution for group control is to use the groups tab in the digitalSTOM configurator. By clicking on the "+" symbol on the top left, a new group for the colour group "shading" is created. Then click on the group "shading" and drag and drop all desired shading devices and the desired central push-button into the newly created group. The central push-button can either be a one-way or a two-way push-button. It is also possible to assign several push-buttons to the group.
The big disadvantage of this solution is the fact, that the group control is performed "beyond" the normal room control. digitalSTROM always works with room states that can be idsplayed in the apps but are also used internally for controlling the system with push-buttons. For example: If the shading in a room is already "open", the next tip on the push-button will close the shading. However, if the group control is used to drive the shading into "closed" position, the room does not notice this process. A one-way push-button would call up the command "close" again, and the system does not seem to respond. If the user presses the push-button for a second time, the command "stop" is called and the system again will not perform any visible movement, which again leads to annoyance. Only the third push-button tip moves the shading as desired. A two-way push-button fixes the problem, as it specifically calls the status "open" or "close". However, if only one of the push-buttons in all rooms is a one-way push-button, the trouble is inevitable.
Rating:
+ Quickly done.
– The group control goes "beyond" the normal room control, the system state is not correct
in the apps.
– One-way push-buttons call unwanted mood scenes, "empty clicks" will happen.
Version 2: App Push-buttons
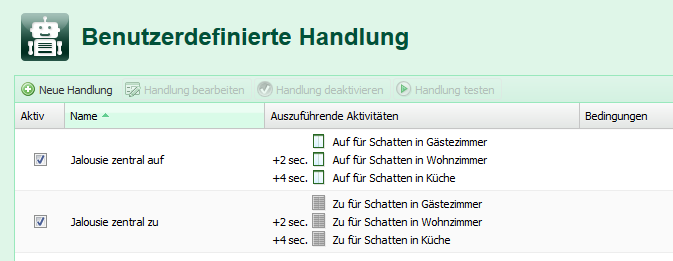
First of all, the desired functions should be created (e.g. central open and central close) in the app “Event Responder”. To do this, add an activity for each room that is to be controlled, like in the example below:
Note: If more than 2 rooms are supplied with shading devices via one dSM, then you should insert a delay of 2 seconds between the calls so that the commands are not lost. If the rooms are connected to different dSMs, no delay is necessary!
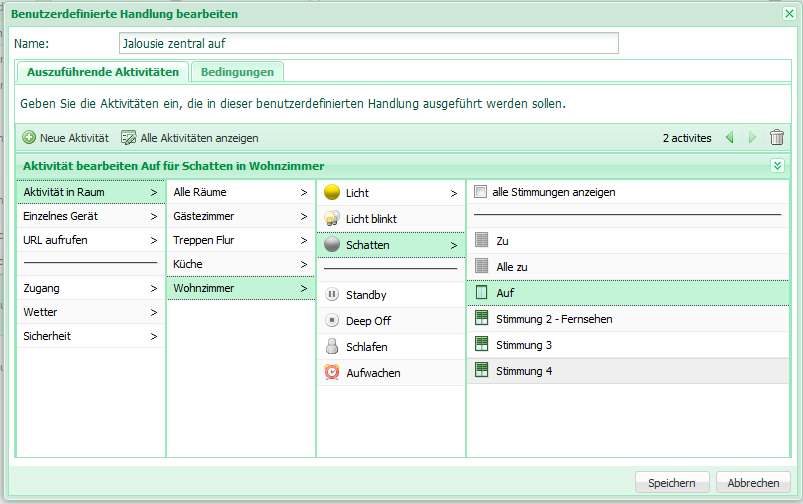
Configuration of a room activity in detail:
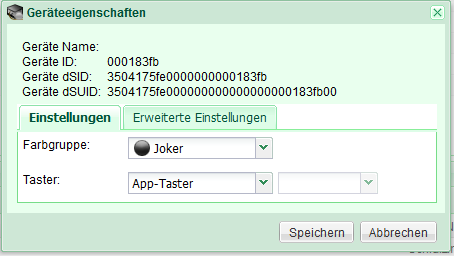
Now one push-button needs to be defined as app key (or two push-buttons, if a separate up/down control is desired) and to assign a name, e.g. central push-button:
Then the scene responder is opened, and the automatisms are being programmed:
- 1. Automatism:
- Trigger: Operate device push-button -> Room with central push-button -> central push-button -> 1x click
- Activity to be performed: User defined action -> open all blinds
- 2. Automatism:
- Trigger: Operate device push-button -> Room with central push-button -> central push-button -> Hold (or 2x click)
- Activity to be performed: User defined action -> close all blinds
If two different app push-buttons are used, the second automatism is also configured with 1x click, but just on the second push-button.
Rating:
+ Actions for group control are directly available to be used via smartphone apps.
+ Room conditions are always correct, since always room activities are called.
+ Operation via one-way push-buttons works perfectly, no "empty clicks"
– Configuration is time consuming.
– Not all devices are controlled exactly at the same time during execution.
– The execution cannot be stopped.
– The group push-button can only call the conditions "open" and "close" but no further
mood scenes.
– If a one-way push-button is used, you have to remember, that 1x click means "open all" and
2 x click means "close all".
Version 3: Push-button in a special room
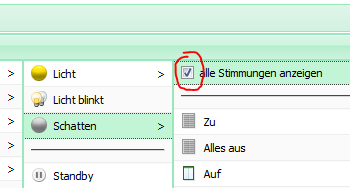
This solution requires a new room. Via tab "rooms" in the digitalSTROM configurator a new room called "central control" is created via the "+" symbol on the top left, and a push-button is dragged in which needs to be configured as a room push-button. It should be a two-way push-button to avoid "empty clicks", which could occur when using a one-way push-button. Now the user-defined actions are programmed as described under version 2. An additional action "shading stop all" is created, which sends the command "stop" into the corresponding rooms. For this purpose, the option "show all mood scenes" has to be selected, so that at the end of the list "stop" can be selected.
The list of activities should look something like this:
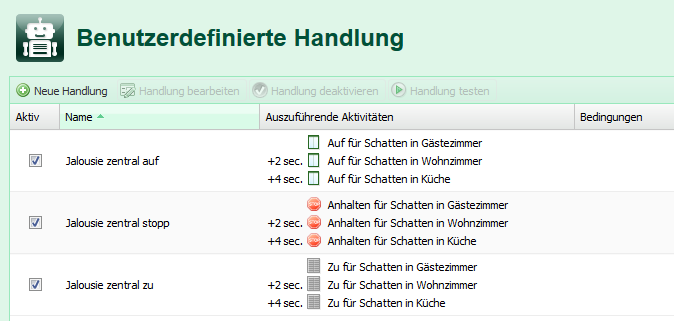
Please note again, that the delay is only required if several rooms are linked to the same dSM, see explanation above.
After that you can program the scene responder automatisms, which ensure that the other rooms follow the room "central control":
- 1. Automatism:
- Trigger: activity in room -> central control -> shading -> Open
- Activities to perform: Event responder -> Shading open all
- 2. Automatism:
- Trigger: activity in room -> central control -> shading -> close
- Activities to perform: Event responder -> Shading close all
- 3. Automatism:
- Trigger: activity in room -> central control -> shading -> stop
- Activities to perform: Event responder -> shading stop all
On request, other actions and automatisms can be created to call the mood scenes 2, 3 and 4 centrally.
Rating:
+ Actions for group control directly available to be used via smartphone apps.
o The room "central control" also appears in smartphone apps, but can also be controlled
via smartphone.
+ Room conditions are always correct, since always room activities are called up.
+ One-way operation works perfectly, without annoying "empty clicks".
+ Open all / close all / stop all can be called up as well as further mood scenes upon request.
– Configuration is quite time consuming.
– Not all devices are controlled exactly at the same time during execution.
Conclusion
Depending on the application, you should opt for one version. Version 1 is usually not the first choice. Version 2 is particularly suitable for one-way central push-buttons and version 3 is the most flexible version. Under no circumstances should a central action in an automatism or via Event Responder be performed simultaneously in all rooms, such as: " Activity in room -> any room -> shading -> close/open. On the one hand, the room conditions are also not changed, on the other hand, this really affects all shading devices, so for example an awning, which is undesirable.